Joystick JVS To USB Adapter Customize Button Layout Game Controller Converter Dual Joystick Mode for JVS Based System
Original price was: $33.51.$17.76Current price is: $17.76.
Description

Price: 33.51 - 17.76


Specification:
Origin: Mainland China
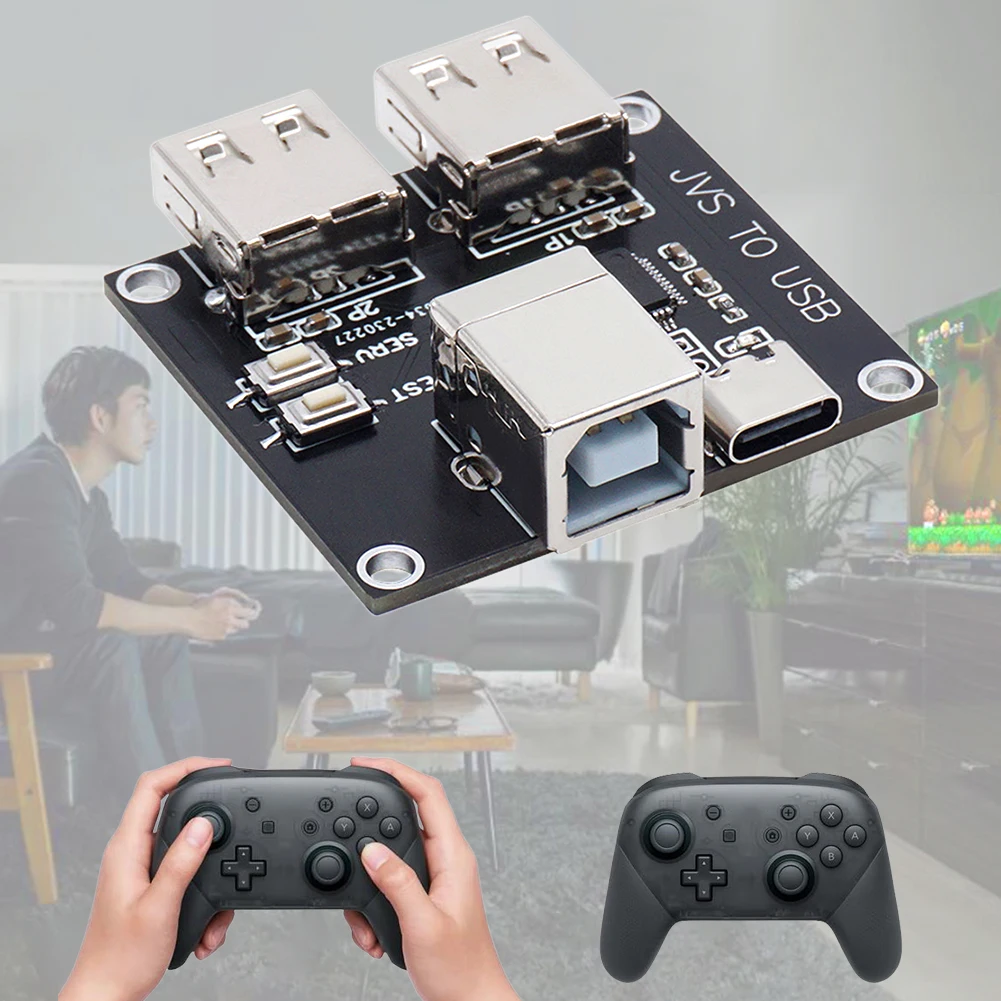
Compatibility: for Xbox 360/for Xbox One series/for PS4/for PS3/for Switch handle
Material: PCB
Product weight: 15g
Packaging weight: 30g
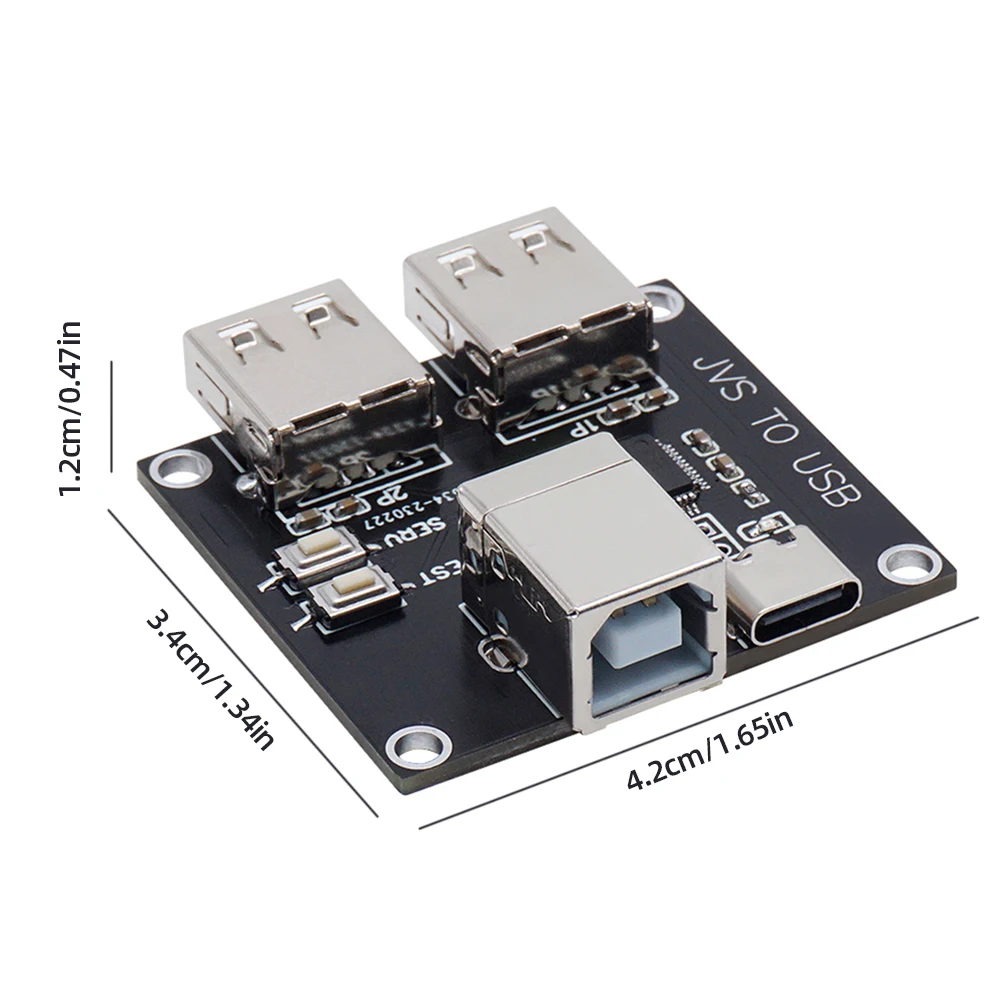
Product size: About 42x34x12mm/1.65×1.33×0.47inch
Packaging size: 105x80x25mm/4.13×3.14×0.98inch
Instructions for use:
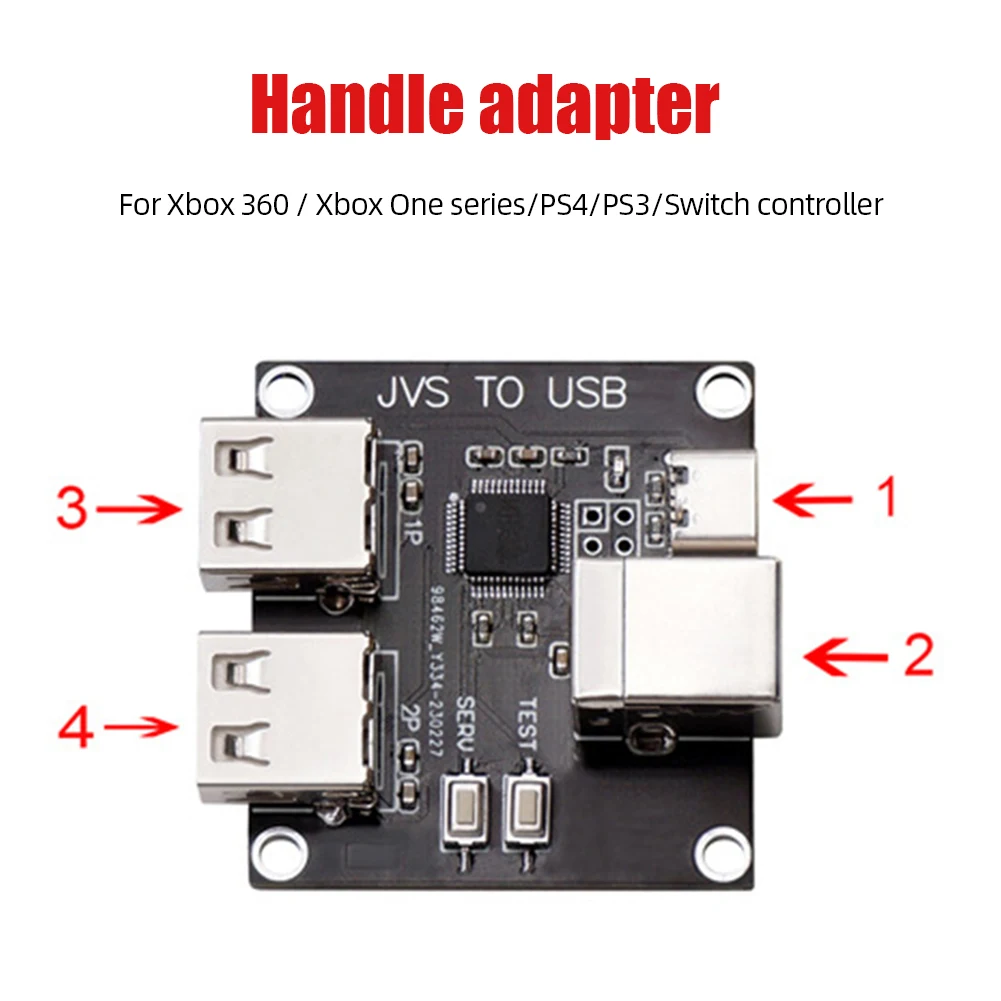
1. Connect the USB Type C port for power supply. It does not require data connection, only 5V power supply for IONA.
A USB charger will be available. The PC USB port can also support the required battery level.
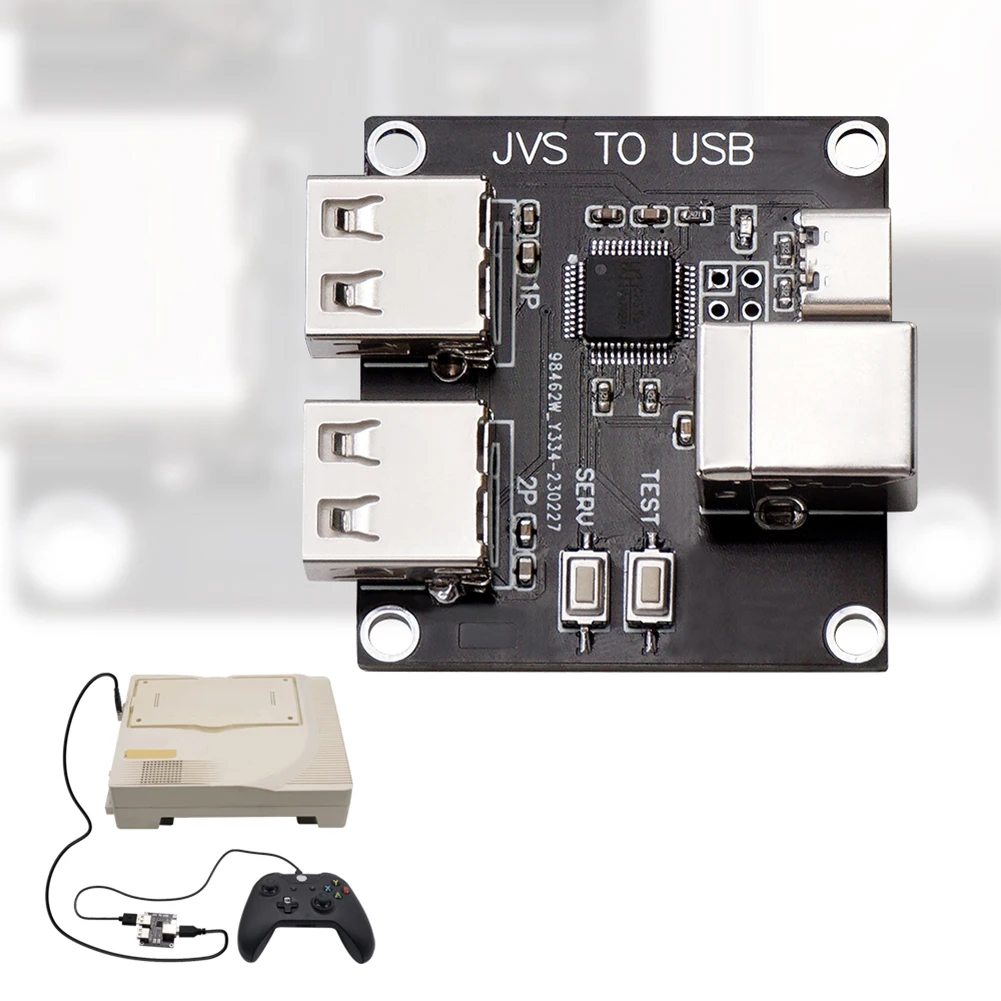
PC based JVS system boards can have a port for this purpose, such as exA Arcadia with a hidden USB port.
But if you want to use devices that require a lot of power, the power supply from the PC via USB bus may not be sufficient, and IONA will become unstable.
2. Connect the JVS port to the JVS system board. You can use a regular USB data cable.
3. Connect the USB game controller at any time. Even when the JVS bus is active, you can connect and disconnect.
After turning on the power, the LED starts to flash. Once the address is assigned through the JVS bus, the LED will light up. If IONA receives a reset signal through the JVS bus, it will start flashing again.
Set up
Public transportation operation mode
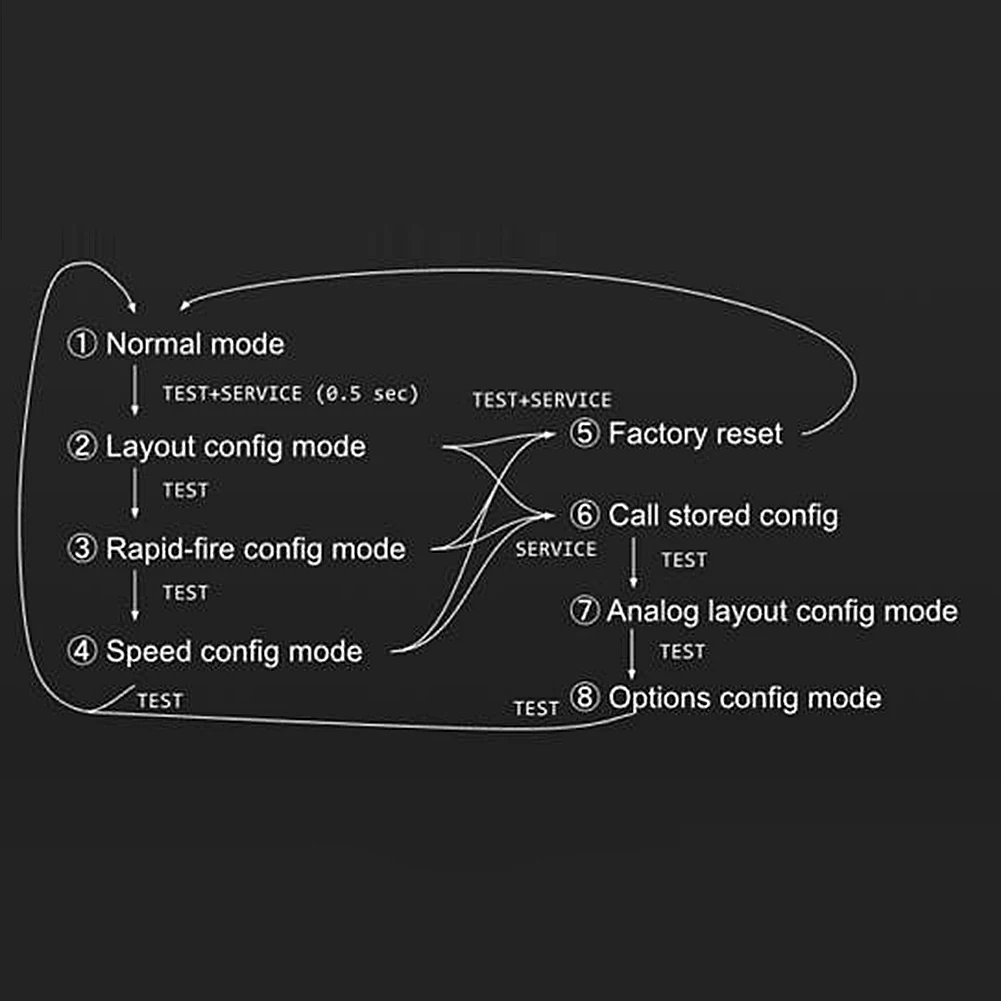
At startup, IONA runs in normal mode. Press the TEST and SERVICE buttons on the IONA board to switch operating modes.
1. Normal mode (LED – flashing or on, depending on JVS bus status)
Works as a JVS I/O handle with selected settings.
2. Layout configuration mode (LED – fast flashing)
Push TEST and SERVICE together to enter layout configuration mode. You need to press for at least 0.5 seconds and at most 5 seconds simultaneously. You don’t need to put them all together, for example, keeping TEST pressed and clicking on SERVICE will work.
In button layout mode, you will select physical buttons, coins, start, and buttons 1 to 10 in the following order. If multiple buttons are pressed together, multiple physical buttons can be assigned as one button. You don’t need to push them at the exact time either.
When you press a button, IONA starts recording all pressed buttons until all buttons are released, and then assigns them all to the target button. Continue this sequence until all 12 buttons are mapped. If you leave this mode before setting all, the remaining buttons will remain unassigned. If you haven’t configured any buttons, IONA won’t update the layout and move to the next mode at all.
3. Continuous shooting configuration mode (LED flashing)
You can press multiple physical buttons to enable fast shooting. Similarly, time should not be accurate. You can try multiple times until you exit this mode.
4. Speed configuration mode (LED – slow flashing)
You can choose the burst speed through buttons 1-6. Button 1-6 is not a physical button, but a button mapped in a custom layout. Each button 1-6 maps to 30/20/15/12/10/8.5 fps. You can try at any time until you exit this mode. If you press multiple buttons, the speed will be faster. If the release time is different, the latter will be used.
The settings selected above will be permanently stored.
5. Restore factory settings (LED flashing)
You can reset all settings and restore default settings by simultaneously pressing TEST and SERVICE outside of normal mode. The LED flashes and then automatically returns to normal mode.
6. Call storage configuration (LED – off)
You can enter the mode of calling storage configuration by pressing the SERVICE button outside of normal mode. Press button 1-10 in the custom layout to call configuration set 1-10. The initial factory setting is 1. You can call another configuration again until you press SERVICE again to exit the mode. If the firmware version is earlier than 1.40, press SERVICE to return to normal mode. Otherwise, for versions 1.40 and higher, pressing TEST will move to simulated layout configuration mode.
7. Simulated layout configuration mode (LED – fast flashing)
You can select 6 inputs for the analog signal report. When you enter this mode, the analog input value will be remembered as the base value. You can move an analog joystick or trigger that is recognized as an analog input. You may want to move it to the right, down, or with normal polarity. If you want to reverse it, you can move it to the opposite side. Once you stop moving the joystick or trigger and return it to its original position, the input will be recorded. You need to repeat the same steps 6 times for analog inputs 1 to 6. You can exit this mode by pressing TEST and skip the following assignments and use the previous settings.
8. Option configuration mode (LED flashing)
You can press TEST to exit the setup mode, but when exiting the mode, the options will be set through the P1 button, as shown below. According to your custom layout, button numbering is logical. The default setting is fully closed.
Origin: Mainland China
Compatibility: for Xbox 360/for Xbox One series/for PS4/for PS3/for Switch handle
Material: PCB
Product weight: 15g
Packaging weight: 30g
Product size: About 42x34x12mm/1.65×1.33×0.47inch
Packaging size: 105x80x25mm/4.13×3.14×0.98inch
Instructions for use:
1. Connect the USB Type C port for power supply. It does not require data connection, only 5V power supply for IONA.
A USB charger will be available. The PC USB port can also support the required battery level.
PC based JVS system boards can have a port for this purpose, such as exA Arcadia with a hidden USB port.
But if you want to use devices that require a lot of power, the power supply from the PC via USB bus may not be sufficient, and IONA will become unstable.
2. Connect the JVS port to the JVS system board. You can use a regular USB data cable.
3. Connect the USB game controller at any time. Even when the JVS bus is active, you can connect and disconnect.
After turning on the power, the LED starts to flash. Once the address is assigned through the JVS bus, the LED will light up. If IONA receives a reset signal through the JVS bus, it will start flashing again.
Set up
Public transportation operation mode
At startup, IONA runs in normal mode. Press the TEST and SERVICE buttons on the IONA board to switch operating modes.
1. Normal mode (LED – flashing or on, depending on JVS bus status)
Works as a JVS I/O handle with selected settings.
2. Layout configuration mode (LED – fast flashing)
Push TEST and SERVICE together to enter layout configuration mode. You need to press for at least 0.5 seconds and at most 5 seconds simultaneously. You don’t need to put them all together, for example, keeping TEST pressed and clicking on SERVICE will work.
In button layout mode, you will select physical buttons, coins, start, and buttons 1 to 10 in the following order. If multiple buttons are pressed together, multiple physical buttons can be assigned as one button. You don’t need to push them at the exact time either.
When you press a button, IONA starts recording all pressed buttons until all buttons are released, and then assigns them all to the target button. Continue this sequence until all 12 buttons are mapped. If you leave this mode before setting all, the remaining buttons will remain unassigned. If you haven’t configured any buttons, IONA won’t update the layout and move to the next mode at all.
3. Continuous shooting configuration mode (LED flashing)
You can press multiple physical buttons to enable fast shooting. Similarly, time should not be accurate. You can try multiple times until you exit this mode.
4. Speed configuration mode (LED – slow flashing)
You can choose the burst speed through buttons 1-6. Button 1-6 is not a physical button, but a button mapped in a custom layout. Each button 1-6 maps to 30/20/15/12/10/8.5 fps. You can try at any time until you exit this mode. If you press multiple buttons, the speed will be faster. If the release time is different, the latter will be used.
The settings selected above will be permanently stored.
5. Restore factory settings (LED flashing)
You can reset all settings and restore default settings by simultaneously pressing TEST and SERVICE outside of normal mode. The LED flashes and then automatically returns to normal mode.
6. Call storage configuration (LED – off)
You can enter the mode of calling storage configuration by pressing the SERVICE button outside of normal mode. Press button 1-10 in the custom layout to call configuration set 1-10. The initial factory setting is 1. You can call another configuration again until you press SERVICE again to exit the mode. If the firmware version is earlier than 1.40, press SERVICE to return to normal mode. Otherwise, for versions 1.40 and higher, pressing TEST will move to simulated layout configuration mode.
7. Simulated layout configuration mode (LED – fast flashing)
You can select 6 inputs for the analog signal report. When you enter this mode, the analog input value will be remembered as the base value. You can move an analog joystick or trigger that is recognized as an analog input. You may want to move it to the right, down, or with normal polarity. If you want to reverse it, you can move it to the opposite side. Once you stop moving the joystick or trigger and return it to its original position, the input will be recorded. You need to repeat the same steps 6 times for analog inputs 1 to 6. You can exit this mode by pressing TEST and skip the following assignments and use the previous settings.
8. Option configuration mode (LED flashing)
You can press TEST to exit the setup mode, but when exiting the mode, the options will be set through the P1 button, as shown below. According to your custom layout, button numbering is logical. The default setting is fully closed.
Note:
Due to the different monitor and light effect, the actual color of the item might be slightly different from the color showed on the pictures. Thank you!
Please allow 1-2cm measuring deviation due to manual measurement.

1 x Controller Adapter


Related products
-
Sale!

Anker USB C 30W 511 Charger (Nano 3) Foldable PPS Fast Charger Tpye C Charger for iPhone 15/15 pro, Galaxy iphone Charger A2147
Original price was: $24.86.$17.40Current price is: $17.40. -
Sale!

UGREEN GaN 45W USB Charger Fast Charger PD QC 3.0 USB C Charger Quick Charger For iPhone 14 13 Travel Charger for Samsung S21
Original price was: $49.98.$30.66Current price is: $30.66. -
-
Sale!
Baseus 24W Quick Charge 3.0 USB Charger For Samsung Xiaomi Huawei Fast Charging QC 3.0 Travel Mobile Phone Charger EU US Plug
Original price was: $6.29.$6.00Current price is: $6.00.
Reviews
There are no reviews yet.